
It’s been five years since my last update, so I figured I’d write-up a fun reverse engineering journey I recently had.
For years I’d been putting off getting a 3D printer, mostly because of the cost and the space it would take up on my workbench. So when a friend of mine sent me a link to the MP Mini Delta 3D Printer campaign on Indiegogo, I couldn’t resist buying it. I’d had positive experiences with monoprice printers in the past, so I figured it was worth the risk.
The printer arrived in August 2017 as promised, and best of all, it worked exactly as advertised.
Fast-forward to January 2018. My friend Dave stopped by my place while I was in the middle of a print (cases for my “one-key” keyboard). Needless to say, he was blown away by the price point and ordered one for himself right there on the spot. After it arrived, he decided to try the firmware update using an SD card and the instructions found on the Monoprice Mini Delta wiki page. Based on all the warnings and comments, this update seemed risky, but he had no trouble updating his unit.
Now you may ask: “why update if it’s risky?”. Turns out the old firmware has several serious bugs such as “randomly crash into the printer bed and stall until a power cycle occurs”. To me, this firmware update sounded like a great idea. Especially given the fact that Dave was able to update his unit without any issues. In fact, I figured I’d use his SD card to update my machine, as it seemed less risky. So I inserted the SD card, selected the bin file for the firmware update, and hit go.
(…this is the point in the story where everything turned to shit.)
Needless to say, the firmware update wasn’t successful. And worst of all, the printer was no longer responding.
“What’s the first thing to try?”, I thought. “Try turning it off and on again of course!”
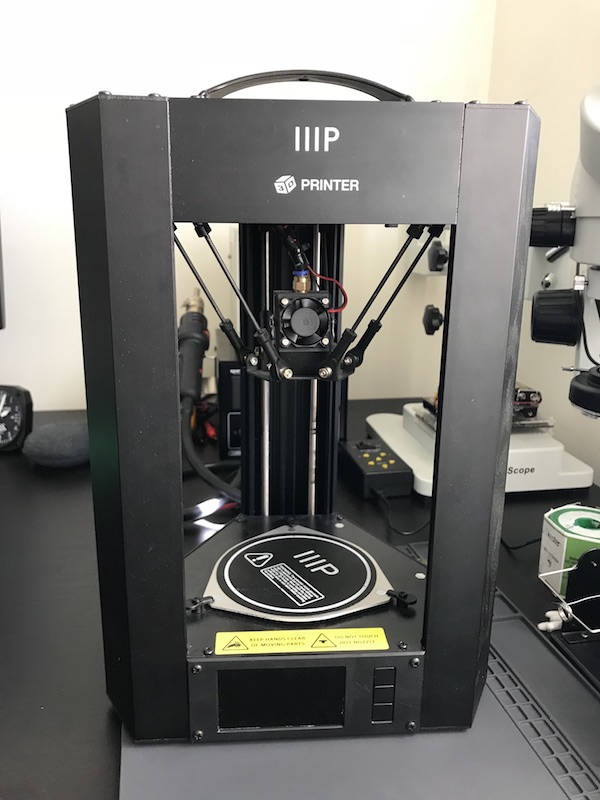
Except every time I did this, the printer would show the boot screen with the “IIIP” logo, but without a firmware version (not a good sign). The main menu would appear, but all the temperature readouts read “0” and the printer no longer enumerating as a USB device.
How lovely. Now I have a “bricked” printer with no known method of recovery.
Thankfully I had some spare time that evening and figured it was worth cracking open to see if there’s an alternative method to flashing the bin file to whatever chip is inside.
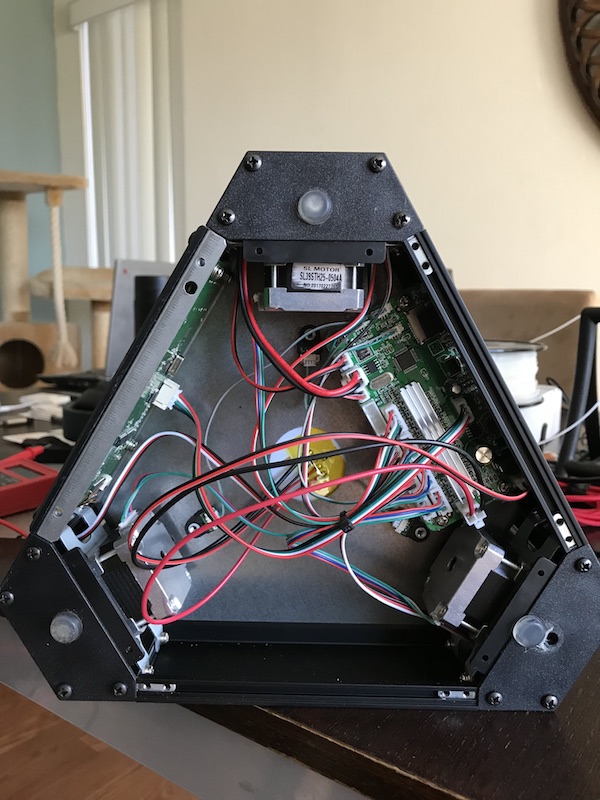
After opening the printer, the first observation I made was that the electronics consist of two PCBs: one does the motor control (called the Motion Controller) and the other handles the LCD and WiFi (called the LCD Controller). This explained why the LCD turned on and even allowed me to navigate through the menu. From what I could tell, the LCD Controller was attempting to talk to the Motion Controller, but the Motion Controller wasn’t running correctly since the firmware had become corrupted.

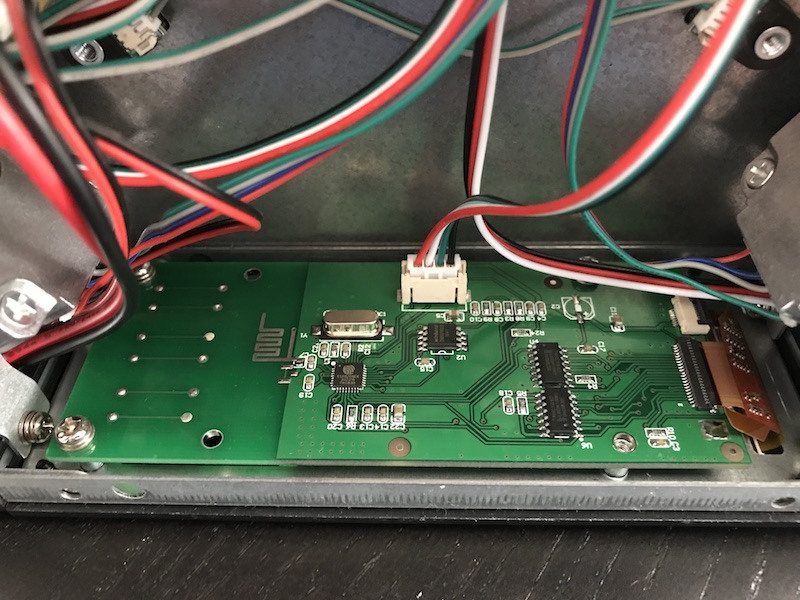
After looking closer at the boards, I was excited to learn that the Motion Controller uses an STM32F070CB and that the LCD Controller uses an ESP8266. Both of these chips are very well documented and the tools to program them are relatively cheap.
To start, I download the datasheet for the STM32F0x family to look for debug pins. I knew that all the STM32 processors that I’d come across have a Serial Wire Debug (SWD) interface, so things looked very promising.
The datasheet showed that Pin 34 (PA13) is SWDIO and Pin 37 (PA14) is SWCLK. So I followed the traces of those pins to this conveniently placed 4-pin header located at the edge of the board. Much to my excitement, the pins for this header are: 3.3V, GND, SWDIO, and SWCLK.
I thought that all I had to do was wire-up my ST-LinkV2 Debugger to the motion controller board, connect to the target, and flash it with the bin file and I’d printing again in no time.

** I’d like to take this moment to say that, in hindsight, I was clearly rushing and not thinking about what I was going to do next…**
I soldered some jumper wires to the motion controller board and used my ST-LinkV2 debugger to connect to the microcontroller. After the debugger connected, I tried flashing it the bin file from the monoprice wiki page…
This is where my memory gets a bit hazy. I hadn’t begun to carefully document all my observations and actions, but I do remember flashing the chip without any problems. I simply selected the firmware.bin file, set the address offset to 0x0800_0000 (the start of flash memory), and hit enter.
The chip flashed successfully, so I rebooted it with hopes of seeing the firmware version on the splash screen, but alas, no luck. Even worse, I realized the big mistake that I had just made… I remembered that the printer ships with a bootloader and that this bootloader was clearly not the built-in stm32 bootloader since it was capable of updating via SD card (built-in bootloader will only update via USB, UART, or I2C). So any custom written bootloader would have to live at 0x0800_0000 since it’s the first thing to run when the microcontroller starts up. So I realized that had just written over the precious bootloader I needed to start the firmware binary in the first place. Lovely.
With the bootloader gone and the application not starting up, I began to wonder what the application binary actually looked like and how it was structured.
This was a good time to step back and learn more about the inner workings of the microcontroller and to take a more methodical approach fixing this printer. Let’s not make things worse by guessing.
The goal now was to learn what a custom bootloader does and what the differences are between a standalone application and a boot-loaded application.
It was around this time when I asked my friend Adam (@adamgreig) about bootloaders and applications. To which he pointed me to the STM32F0 Reference Manual. This manual contains a complete breakdown of the microcontroller. It’s a pretty dense document, but the important items to note are the memory map, vector table, and the general information about the Cortex-M0 architecture.
Let’s start with the easy stuff…
General Information:
Processor: STM32F070CB
Arch: ARM Cortex M0
Instruction Set: Thumb-2
Endianness: Little Endian
Stack Pointer: decrements on push, increments on pop
Program Counter (equivalent to the instruction pointer in x86): increases after each instruction
Groovy. Next let’s look at the memory map…
STM32F0 Memory Map:

We note the relevant address offsets:
Clock Regs 0x4002_1000
Peripherals 0x4000_0000
SRAM 0x2000_0000
Flash 0x0800_0000
But what’s going on at address 0x0000_0000?
Well, it turns out that address 0x0000_0000 is where the microcontroller always begins execution and that the memory at this location is mapped to different address offsets based on a few bits located in the SYSCONFIG register.
I could go into more detail about this, but I feel Jordi Castells has done an excellent writeup about it here: https://jcastellssala.com/2016/12/15/cortex-m0-boot/ (Thanks for the link, @charliex!).
Finally, the interrupt and exception vectors…
STM32F0 Vector Table:

Now you may be asking, what’s a Vector Table?
(I certainly didn’t know what it was when I first heard about it. For most projects, I usually write my code in C using some open-source toolchain which would handle generating the binary containing the vector table.)
A vector table is a set of 32-bit addresses which live at the start of any Cortex-M0 binary file. The processor uses these addresses as a lookup table for interrupt and exception vectors. For example, every application has a reset vector. This is defined the address location for the reset routine so that when it is invoked, the processor knows where in memory to jump to for executing the reset routine. For the Cortex-M0 family, the reset vector lives at offset 0x04 in the binary. Meaning that if you were to open up any binary built for the Cortex-M0, the second 32-bit word will be the reset vector. Remember this vector as it will prove to be extremely useful later when we get to the disassembly process.
Based on what I had gathered, a standalone application would have a memory map that looks something like this:

The binary for a standalone application is built to be loaded at address 0x0800_0000 (defined in the linker memory configuration script) and the SYSCONFIG register is configured to remap 0x0000_0000 to 0x0800_0000 (flash). This way, when processor starts, it jumps to the reset vector located at offset 0x04.
Now that I had a rough idea of how the binary file is structured, I opened the firmware.bin file and noticed that reset vector is pointing to address 0x0801_71F5. Adam pointed out that in ARM, if you branch to an even address it’s seen as ARM assembly, where as odd addresses are seen as Thumb2. This is denoted using the lsb of the address. Since the STM32F070 is thumb2, the reset vector is actually at 0x0801_71F4.
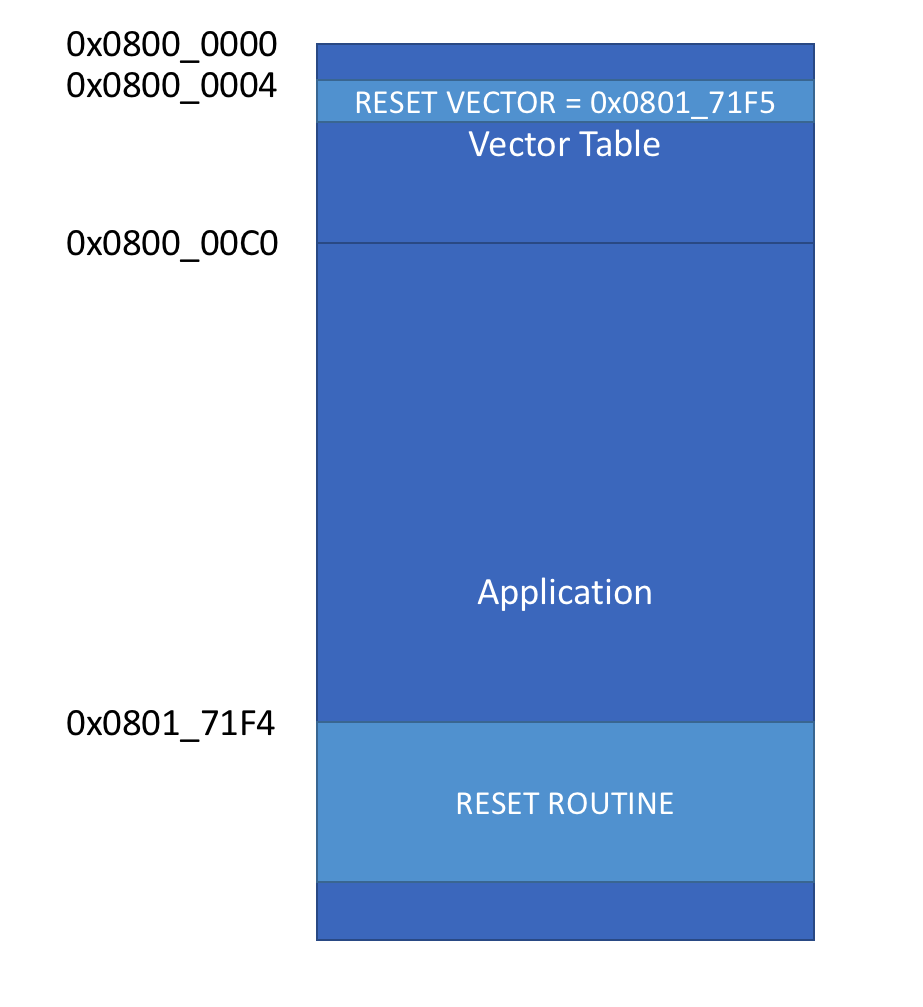
Note: Endianness is Little Endian
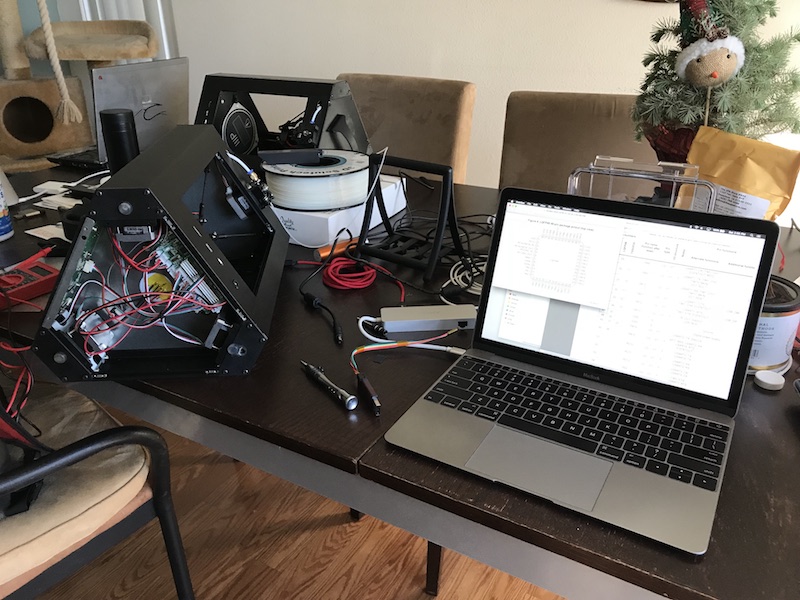
At this point in the project, I purchased Binary Ninja to attempt to disassemble the firmware binary. Using Adam’s Firmware Image tool, I fed Binary Ninja the Entry Point (0x0801_71F4), but I faced the problem of “what’s the start address?”.
We need the start address for two reasons, one if we want to get the application to execute correctly, we need to load it to the right place, and it’s clear that the start address isn’t 0x0800_0000. The second reason we need to know the start address is that the disassembler needs it to find all the subroutines within the binary.
We know the application is hardcoded to execute from some given offset (as any good binary should), but I wasn’t sure if there was an easy way to find this. Using the knowledge that program memory is broken up into pages and that pages have a length of 0x800, I tried entering a few different start addressed into Binary Ninja using offsets that are multiples of that length. After trying 0x800, 0x1000, 0x1800, Binary Ninja found over a hundred subroutines when the offset was set to 0x2000, so it became clear that 0x0800_2000 is the Start Address for the binary.
Now that I knew the start address of the application, I could write a custom bootloader to launch it correctly!
To put it simply, a bootloader can be seen as a self-modifiying standalone application. It has it’s own vector table and routines for loading, checking, and booting applications. But this means that any application written for it, would have to be built for some fixed memory offset outside the bootloaders memory region. Which means the memory map would look something like this:
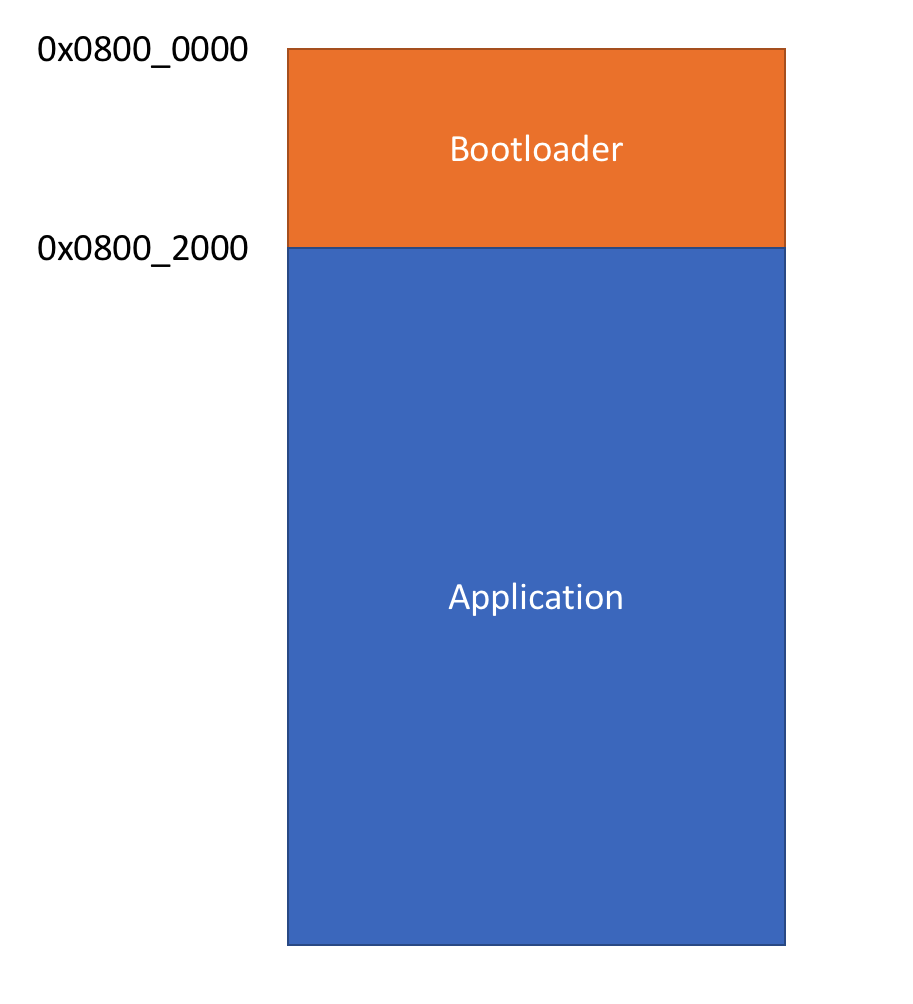
It’s clear that I need a bootloader to start the application and that the only two options I have are to either write my own bootloader or some extract the bootloader from a second printer.
I figured, why not try both?
I still needed to continue printing things for my projects and in the event that I’m unsuccessful in recovering my broken printer, I’d at least have a working one. So I purchased a second printer with hopes that the Read Protection wasn’t enabled on the microcontroller.
When the printer arrived, I wired it up and connected to the micro… and guess what: the Read Protection was enabled.
At this point, I had no other option other than to write a custom bootloader…
I approached writing a bootloader by first putting myself in the shoes of the engineer(s) who built this printer. If I were tasked with writing a bootloader, what would I do?
My first instinct would be to search for an open-source bootloader which supports loading applications from an SD Card. So after some quick googling I found OpenBLT (not to be confused with Open Bacon Lettuce and Tomato). It’s primarily used for STM32 microcontrollers and supports updating firmware via SD Card.
The good news was that OpenBLT supports the STM32F070 and has loads of examples. So I figured this was the right place to start.
Next I outlined the tasks the bootloader needs to perform upon startup:
– Disable all interrupts
– Copy the vector table of the application starting at 0x0800_2000 to the start of SRAM (0x2000_0000)
– Remap 0x0000_0000 to the start of SRAM
– Jump to the reset vector of the application
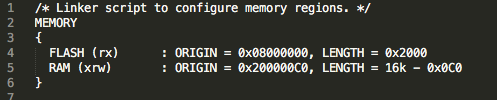
Using the example code for the STM32F090, I modified the linker script to do the following: first, set the flash origin to 0x0800_0000 with a size of 0x2000 (we don’t want the bootloader size to overflow into the application memory), and second, to set the SRAM origin to 0x2000_00C0, so that we could write the vector table to 0x2000_0000 (we don’t want the bootloader overwriting that memory region):
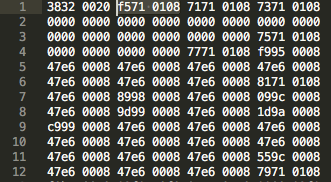
After writing a bootloader to perform the tasks outlined above, I now had a binary file that was smaller than 8K. I knew that I needed the binary to be exactly 8K so that I could merge the application binary with the bootloader. I figured I could just pad the bootloader binary with zeros until it was 8K in size, then append the application to binary using a text editor:
Beginning of hacked_v41.bin (bootloader + application file):

Where the bootloader ends:
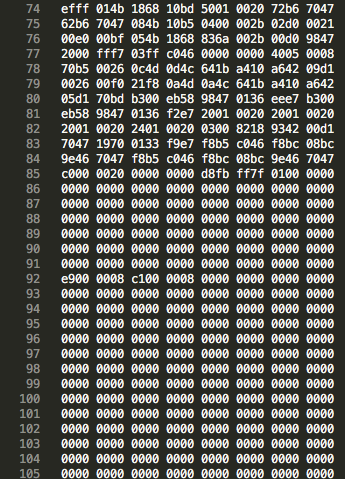
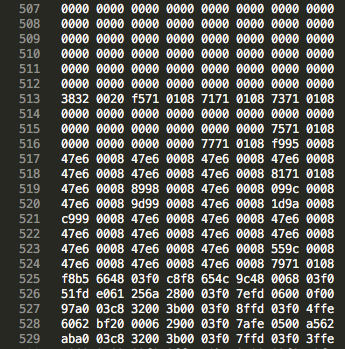
Start of the application:
Now it was time to load the binary and really put all this to the test. I loaded the binary to the chip, setup the debugger to monitor the program counter, and found that the microcontroller was executing the instructions located in application memory! Awesome!
I was *SO* sure that this was it. I power cycled the printer, anticipating the firmware version on the splash screen and…….. no dice. wtf!?
I was a bit disappointed. I wondered what I had done wrong and immediately started sifting through my code hoping for an obvious mistake. After tweaking a few things here and there, I wasn’t making any progress.
I began to question if the LCD firmware version mattered. Perhaps they’d changed the software interface?

So I opened up the working printer, connected the LCD (which I knew had a newer firmware version) to the modified Motion Controller board, and booted it up……. but again, no luck.
At this point, I was curious to see if the Motion Controller was talking to the LCD Controller at all. I pulled out the ye olde logic analyzer and probed the four pins on cable. As expected, two of those four pins were power and ground, and the other two showed some data, but I wasn’t sure what that data was… It looked like serial data.
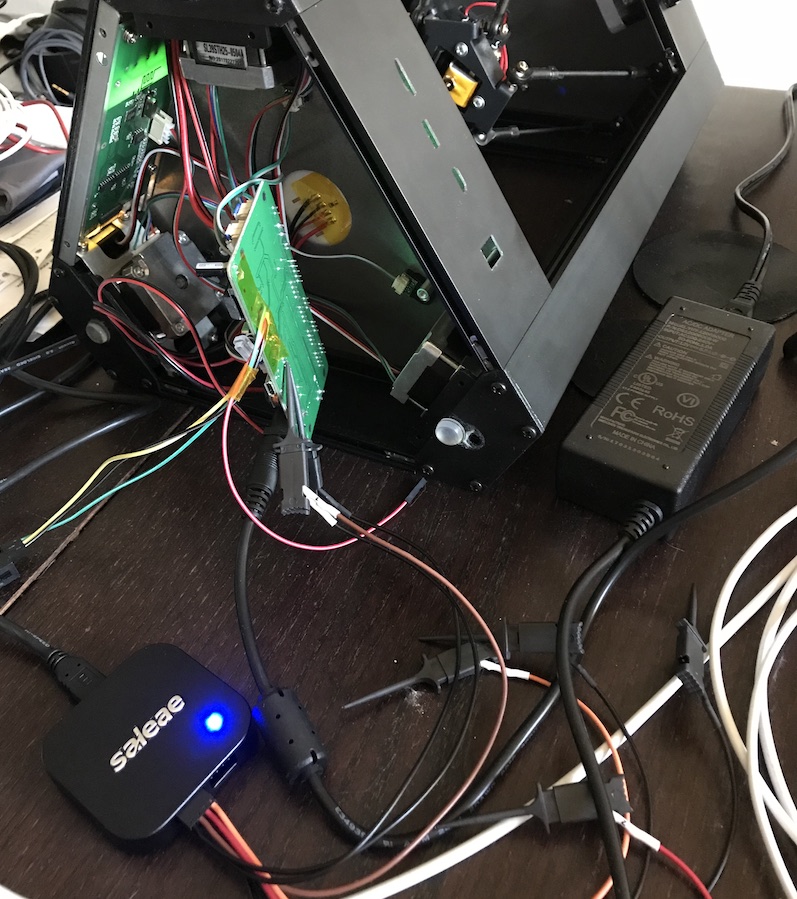
Using the Saleae logic analyzer software, I was able to confirm that it was in fact serial data. To double-check this, I followed the pins to the microcontroller and found that they were wired to the UART1 port.
Next, I attempted to decode the data using the ‘autobaud’ feature and found this:
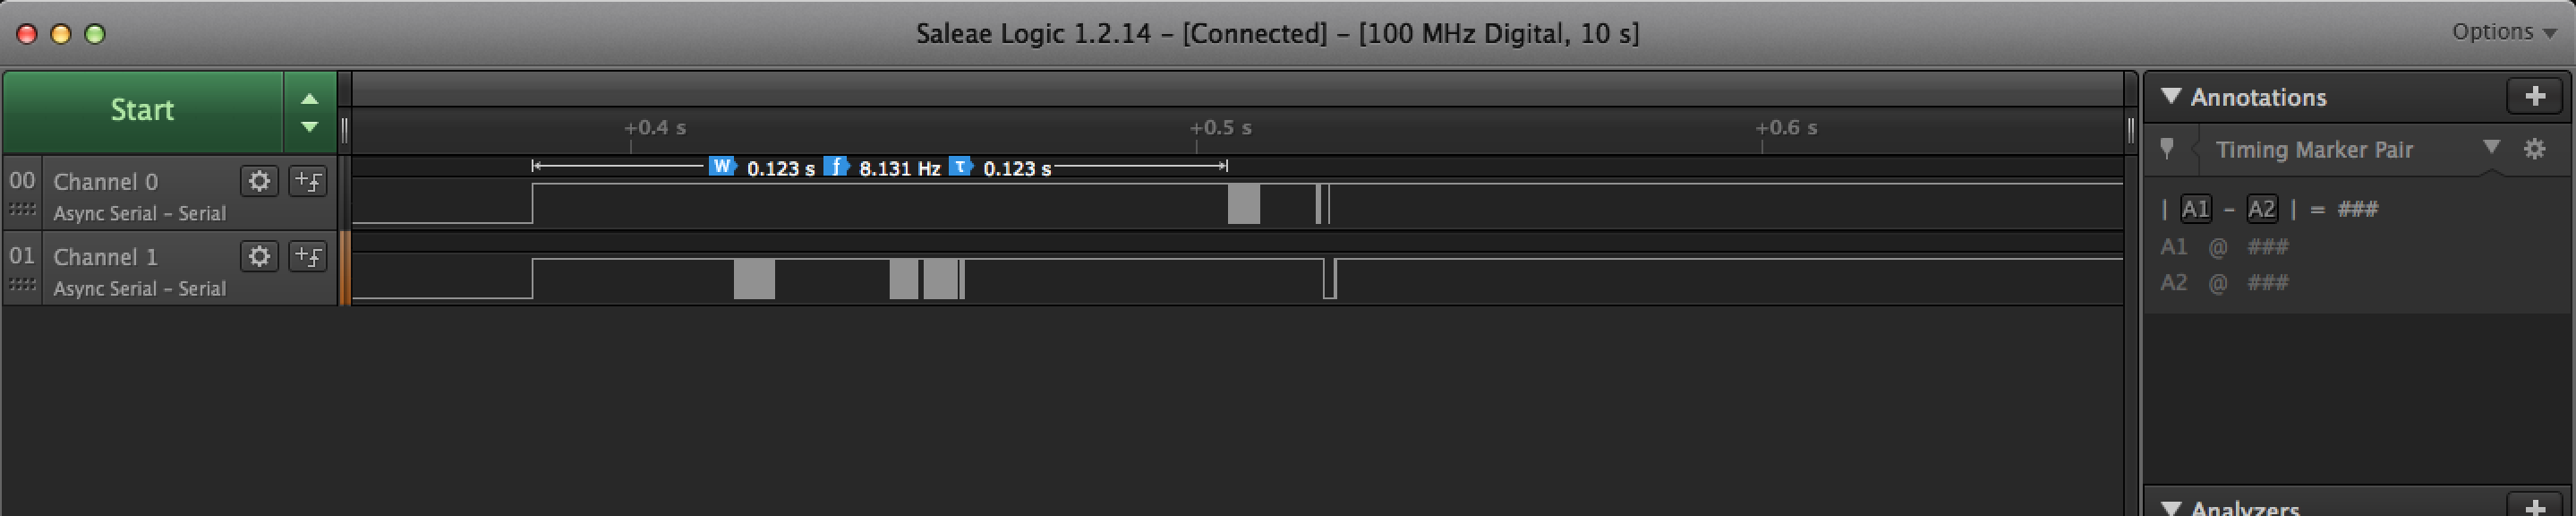
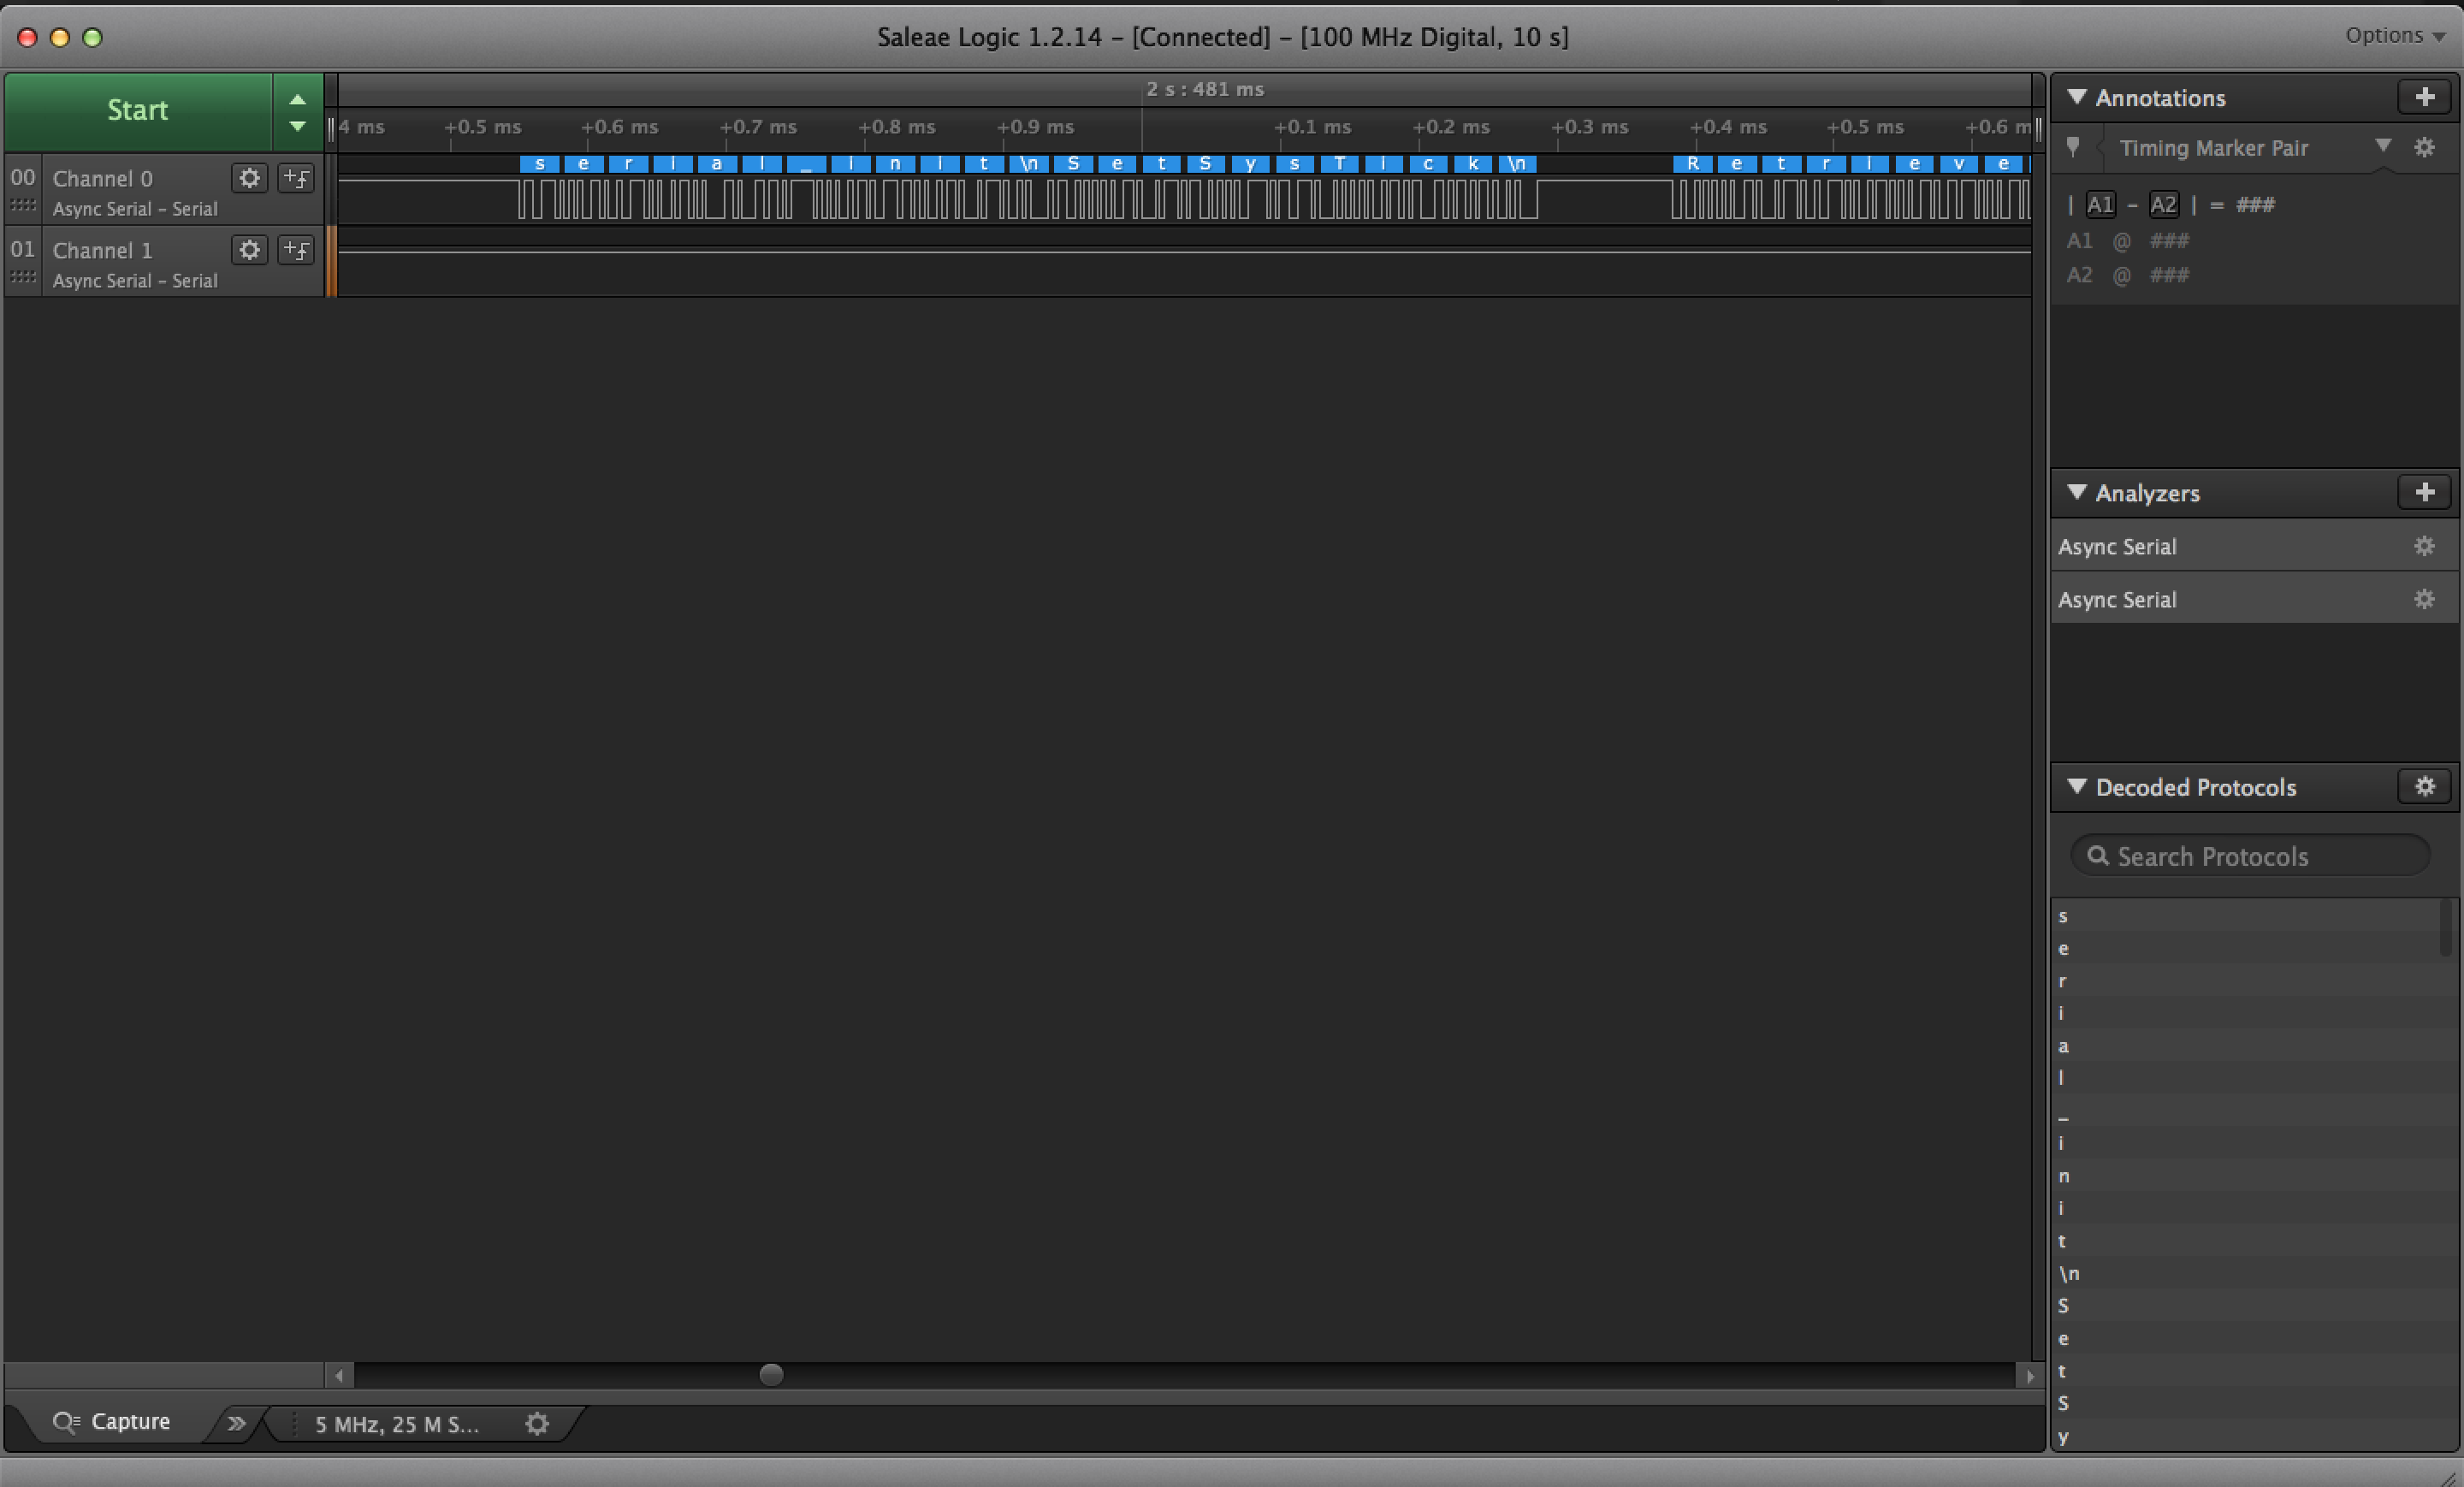
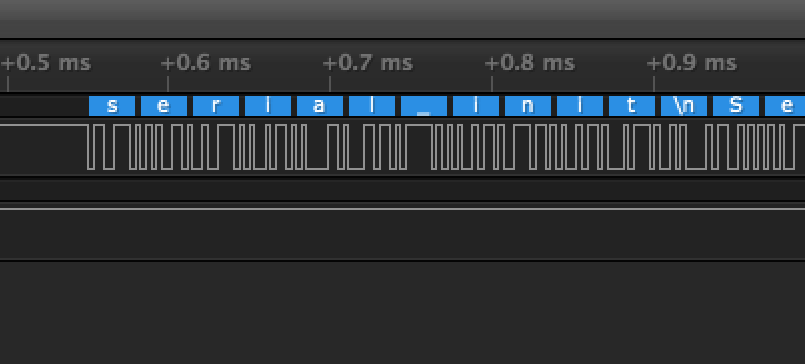
When looking at the microcontrollers TX pin, I observed that the decoded message contained English text, so it was clearly decoding correctly!
Next I probed my working printer to see what the difference was, hoping that this would give me some insight as to what could be wrong.
After gathering data from both printers, I discovered that the baud rate of the microcontrollers UART (with modified firmware) was running at half speed! My first thought was that perhaps my bootloader wasn’t configuring the RCC registers the same way the monoprice bootloader. So I tried a few different things. First thing was to change divider and multiplier settings of the clock, but no matter what values I wrote to RCC registers, I couldn’t get the UART clock rate to change.
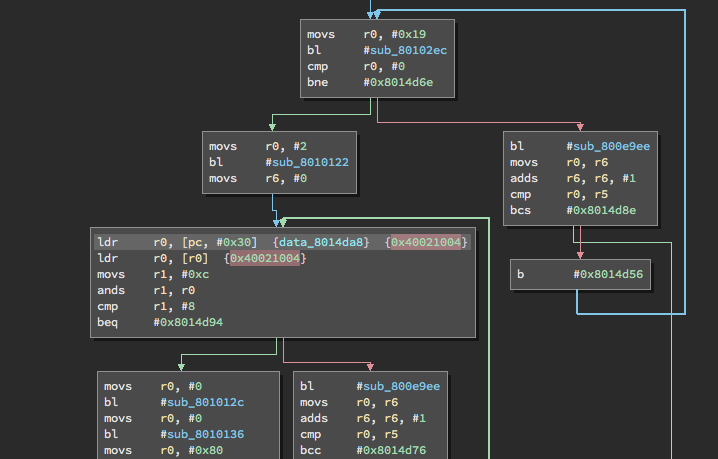
Next, I searched through the disassembled binary to find where the UART clock registers are being initialized and found a subroutine at 0x0801_1ac2 which modifies those registers:
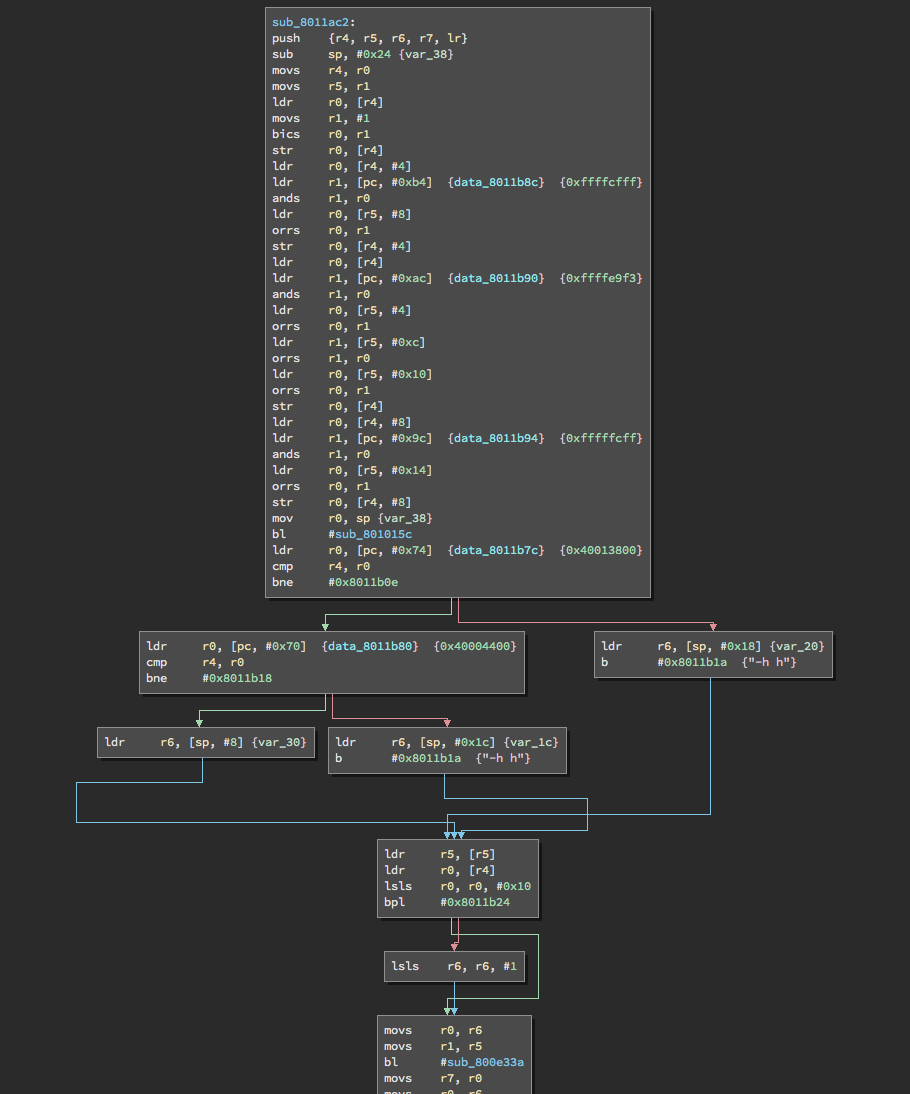
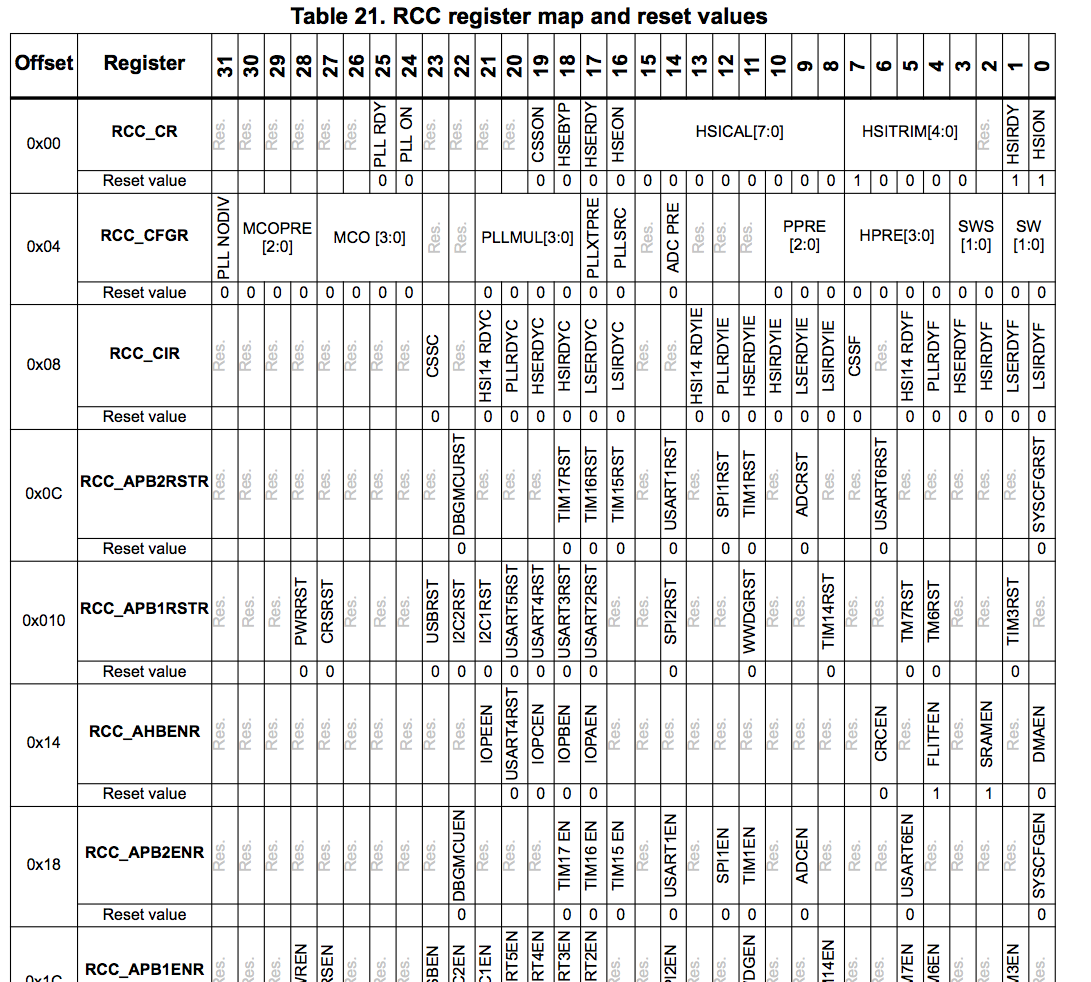
At first glance, we see that application is AND’ing and OR’ing some values against most of the RCC registers, a few of which affect the UART1 clock source. But I’ve tried configuring those bits and I still can’t get it to work…
So I decided to complain about my problems on IRC, and to describe how close I had gotten to getting it to work, and that I couldn’t get the clock settings right… I ended up posted a link to the binary and stepped away. This is when Leo took a crack at looking through the disassembled mess, and had what could only be described as a “Rain Man” moment. He saw through the fog and found an interesting conditional branch located at 0x0801_5A46:

The application was checking the SRAM address 0x2000_0400 to see if it equaled 0xdead_beef, and if it did, it would branch to a bunch of other subroutines… wtf!?
Now guess what the code does if 0x2000_0400 equals 0xdead_beef? If you guessed “modifies the RCC registers”, you’re correct! Not only that, but it does a whole bunch of other stuff too!
Turns out that I didn’t say the magic word…
Next I added the following line of code to the bootloader, right before it launches the application:
*(uint32_t*)0x20000400 = 0xDEADBEEF;
I recompiled the bootloader, appended application, loaded it to the printer and…. BINGO! The printer came back to life!
IT’S ALIVE!!!!!!!
Huge shoutout to @adamgreig and @LeoBodnar for all their help! Couldn’t have done it without you guys! Learned a shitload about reverse engineering ARM firmware 😁 pic.twitter.com/jUtjhf1RXV— Arko (@arkorobotics) March 4, 2018
After all that work, the printer was finally back up and operational. You may ask, was all this trouble worth getting it print again? Hell no. Was it worth doing for the learning experience of reverse engineering arm firmware? Hell yeah.
Now, if you have a MP Mini Delta that’s ‘bricked’, I’d first recommend reaching out to Monoprice and asking for a replacement (or for them to fix it). But if ALL options have been exhausted and you’re thinking about salvaging it for parts (or heaven forbid throwing it away), I’ve posted my hacked firmware along with a tutorial on how to recover the printer on GitHub:
WARNING: I AM NOT RESPONSIBLE FOR ANYTHING YOU DO. USE AT YOUR OWN RISK. I DO NOT PROVIDE ANY SUPPORT FOR THIS CODE OR RECOVERY:
https://github.com/arkorobotics/MiniDeltaBootloader
I want to give a huge shoutout to @adamgreig, @leobodnar and @charliex, for without whom this entire project would be dead in the water. Everything I learned here was due to their willingness to answer my silly questions.
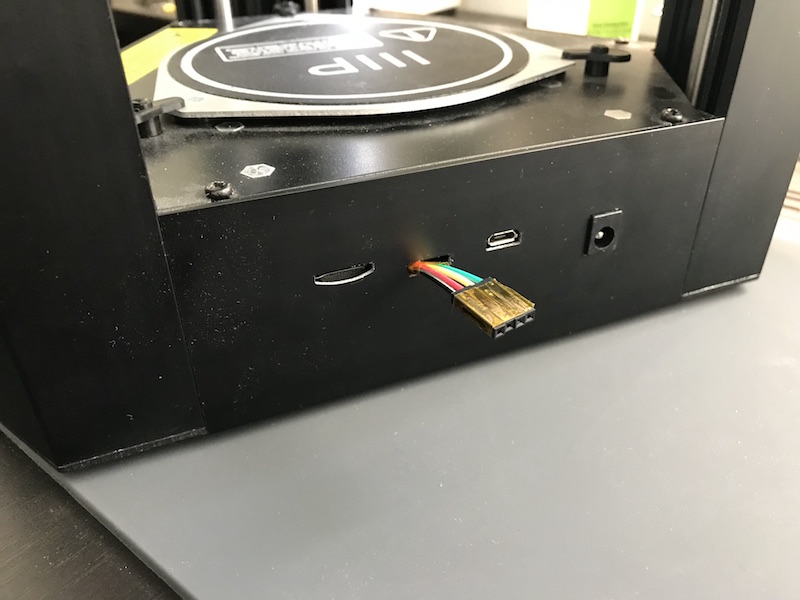
For future development, I’ve added an external debug port to the printer 🙂
See you in another five years!
-Arko
@arkorobotics